ผู้ใช้ NVIDIA บางรายรายงานเกี่ยวกับการประสบปัญหาเมื่อพยายามอัปเกรดไดรเวอร์ NVIDIA บนคอมพิวเตอร์ กระบวนการไล่ระดับสียังไม่เสร็จสิ้นซึ่งนำไปสู่ข้อความแสดงข้อผิดพลาดที่ระบุว่า -“ NVIDIA Installer ล้มเหลว ” สิ่งนี้มักเกิดขึ้นเนื่องจากมีการติดตั้งไดรเวอร์เก่า / ไม่เข้ากันในคอมพิวเตอร์ของผู้ใช้ หากคุณประสบปัญหาเดียวกันไม่ต้องกังวล เพียงลองแก้ไขบนอุปกรณ์ของคุณแล้วปัญหาจะแก้ได้ในเวลาไม่นาน แต่ก่อนที่จะดำเนินการแก้ไขให้ลองวิธีแก้ไขเบื้องต้นเหล่านี้และตรวจสอบว่าได้แก้ปัญหาของคุณแล้วหรือยัง
วิธีแก้ปัญหาเบื้องต้น -
1. รีบูตเครื่องคอมพิวเตอร์ของคุณ ตอนนี้ให้ลองอัปเดตไดรเวอร์ NVIDIA อีกครั้งและตรวจสอบว่าปัญหายังคงมีอยู่หรือไม่
2. ปิดการใช้งานโปรแกรมป้องกันไวรัสและไฟร์วอลล์ในระบบของคุณชั่วคราว ตอนนี้ลองอัปเดตไดรเวอร์อีกครั้ง
หากคุณยังคงพบข้อความแสดงข้อผิดพลาดให้ไปที่การแก้ไขนี้ -
Fix-1 End NVIDIA ประมวลผลและลบโฟลเดอร์ NVIDIA-
1. กดCtrl + Shift + Enterเพื่อเปิดตัวจัดการงาน
2. ตอนนี้ในแท็บ“ Processes ” แล้วเลื่อนลงคุณจะเห็นกระบวนการของ NVIDIA (เช่น - กระบวนการ“ NVIDIA Container”) ทำงานบนระบบของคุณ
3. คลิกขวาที่แต่ละกระบวนการและคลิกที่“ End Task ” เพื่อยุติกระบวนการเหล่านี้ทั้งหมด
คุณควรเห็นกระบวนการเหล่านี้ทำงานในระบบของคุณ -
NVIDIA Backend (32 บิต) NVIDIA Driver Helper Service บริการ NVIDIA Network (32 บิต) การตั้งค่า NVIDIA ส่วนประกอบไดรเวอร์ NVIDIA User Experience

4. เปิดหน้าต่างFile Explorerและไปที่ตำแหน่งนี้ในฮาร์ดไดรฟ์ของคุณ -
C: \ Windows \ System32 \ DriverStore \ FileRepository \
เลื่อนลงในโฟลเดอร์และค้นหาโฟลเดอร์ที่มีรายการที่กำหนดด้านล่างในชื่อและลบออก -
nvdsp.inf
nv_lh
nvoclock

4. จากนั้นในFile Explorer ให้ไปที่โฟลเดอร์เหล่านี้และล้างข้อมูล -
C: \ Program Files \ NVIDIA Corporation \
C: \ Program Files (x86) \ NVIDIA Corporation \

5. รีบูตคอมพิวเตอร์ของคุณและหลังจากรีบูตแล้วให้ทำตามFix-6เพื่อติดตั้งไดรเวอร์ NVIDIA บนคอมพิวเตอร์ของคุณด้วยตนเอง
แก้ไข 2 - ใช้พรอมต์คำสั่ง
1. เปิดพรอมต์คำสั่งในฐานะผู้ดูแลระบบ
2. รันคำสั่งที่ระบุด้านล่างทีละรายการในหน้าต่าง cmd
bcdedit -set loadoptions DISABLE_INTEGRITY_CHECKS bcdedit - ตั้งค่า TESTSIGNING ON
3. ตอนนี้รีสตาร์ทคอมพิวเตอร์และลองอีกครั้ง ปัญหาของคุณจะรุมเร้า
4. หลังจากนั้นเปิดพร้อมรับคำสั่งในฐานะผู้ดูแลระบบอีกครั้งและเรียกใช้คำสั่งที่ระบุด้านล่างเพื่อทำสิ่งต่างๆเหมือนเดิม
bcdedit -set loadoptions ENABLE_INTEGRITY_CHECKS bcdedit - ตั้งค่า TESTSIGNING OFF
Fix-4 อัปเดตไดรเวอร์ NVIDIA จาก Device Manager-
1. หลังจากกด ' แป้น Windows + X ' จากแป้นพิมพ์ของคุณให้คลิกที่ " ตัวจัดการอุปกรณ์ "
ยูทิลิตี้Device Managerจะเปิดขึ้น

2. เมื่อหน้าต่าง Device Managerปรากฏขึ้นให้ค้นหาส่วน " การ์ดแสดงผล "
3. จากเมนูแบบเลื่อนลงให้คลิกขวาที่ไดรเวอร์กราฟิกที่คุณใช้ จากนั้น คลิกที่“ อัปเดตไดรเวอร์ ”

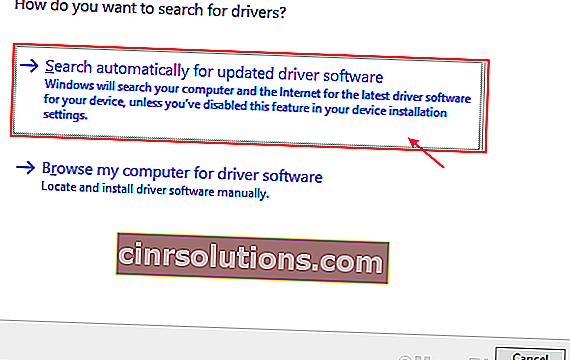
3. ในหน้าต่างถัดไปให้เลือกตัวเลือกที่ระบุว่า“ ค้นหาซอฟต์แวร์ไดรเวอร์ที่อัปเดตโดยอัตโนมัติ ”
เมื่อกระบวนการอัปเดตสิ้นสุดลงให้ปิดหน้าต่างDevice Manager
รีบูตเครื่องคอมพิวเตอร์ของคุณ
Fix-3 ติดตั้งไดรเวอร์ NVIDIA ด้วยตนเอง -
1. ในตอนแรกเปิด Google Chrome
2. จากนั้นค้นหา“ ไดรเวอร์ Nvidia ”
3. หลังจากนั้นคุณต้องคลิกที่“ ดาวน์โหลดไดรเวอร์ | NVIDIA ”

4. . Now, in this window, under ‘NVIDIA Driver downloads’ section choose “Product type“, “Product series“, “Product“, “Operating System“, “Windows Driver Type“, “Download Type” according to your driver specifications.
5. Once you have selected your product, click on the “Search“.

6. Then, click on “Download” to download the driver.

Close the browser.
7. Locate the downloaded application on your disk.
8. Then, double click on it to start the installation process of the driver.

9. Now, in the NVIDIA Graphics Driver window, click on “NVIDIA Graphics Driver and GeForce Experience” and click on “Agree and continue“.

10. Under Installation Options, choose “Express (Recommended)” and click on “Next” to start the installation process.

11. After installation is done, click on “Close” to close the NVIDIA Graphics Driver Installer window.

Restart your computer to finish the installation process.
If you are still facing the problem during the installation, perhaps performing a clean installation of the NVIDIA driver can help you out.
Fix-4 Perform a Clean install
[NOTE– Performing a clean installation will clear any kind of custom settings of the driver on your device. But it will remove any further errors in the NVIDIA installer from your device.]
The NVDIA installer you downloaded during the manual installation (i.e. the Fix-6)will be used in this fix.
1. Go to the location where the installer is located on your computer.
2. When you are in that location, double click on the installer to start the installation.
3. In the NVIDIA Installer window, choose the option “NVIDIA Graphics Driver and GeForce Experience“.
4. Then, click on “Agree and continue“.
5. Now, choose “Custom installation“.
6. Click on “Next” to start the installation process.

7. Now, checkthe “Perform a clean installation” option.
8. Finally, click lick on “Next“.

After installation is done, click on “Close” to close the NVIDIA Graphics Driver Installer window.
Restart your computer to finish the installation process.
You should not face any further issues with the installation of the NVIDIA driver.
Fix-5 Use Display Driver Uninstaller-
1. Download the DDU.zip on your device and after downloading it, unzip the folder in a favorable location of your choice.

2. Now, press Windows Key+R to launch Run, and “control printers” and hit Enter to open Device and Printers window in Control Panel.

3. Now, right-click on your computer name and then click on “Device installation settings“.

4. Now, choose “No (your device might not work as“ expected) and click on “Save Changes“.

Close the Devices and Printers window.
5. Then, google “Nvidia drivers” from your browser and click on “Download Drivers|NVIDIA“.
6. Now, in this window, under ‘NVIDIA Driver downloads’ section choose “Product type“, “Product series“, “Product“, “Operating System“, “Windows Driver Type“, “Download Type” according to your driver specifications.
Once you have chosen the right driver for you computer, click on the “Search“.
7. Click on “Download” to start the downloading process.
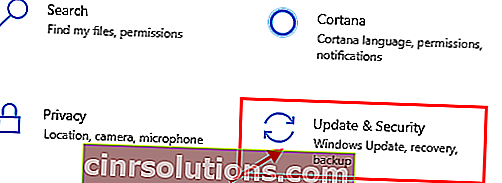
8. Press Windows Icon+I to open Settings application, now click on “Update and Security“.
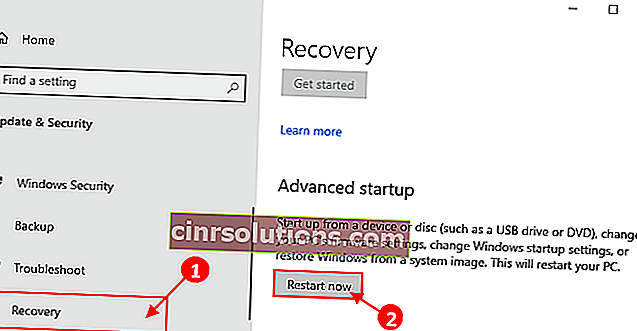
9. Now, on the left pane, click on “Recovery“,
Then, on the right-hand side of the screen, click on “Restart Now” under Advanced Startup.
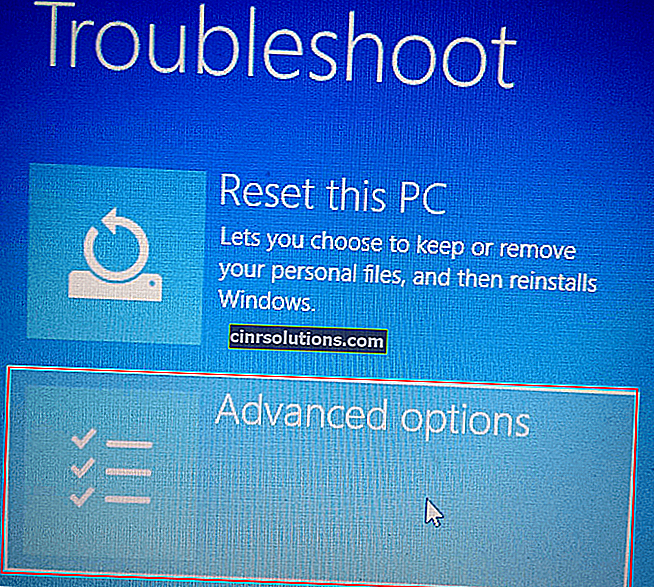
10. Then click on “Advanced options“.
11. Now, within the Advanced options window, click on the “Startup Settings“.

12. Then, click on “Restart”.

13. Now, just press 4 from your keyborad to “Enable Safe Mode“.

In Safe mode, the background of your desktop will be black.
14. Now, navigate to the file location where you have extracted DDU.zip. Double click on “DDU v18.1.0.9” to extract the main files.
Go to the extracted folder, and double click on the “Display Driver Installer” to run it on your device.

15. Now, in the Display Driver Uninstaller window, on the left-hand side, click on the drop-down beside “Select device type” and click “GPU” and finally click on “Clean and Restart“.

16. This will uninstall the NVIDIA driver from your system and you will be booted to normal mode again.
17. Now, you have to boot into safe mode again ( follow the instructions in Step-8 to Step-13 of this fix).
18. After booting into safe mode, locate the downloaded application on your disk.
19. Now, double click on it to start the installation process of the driver.
20. Once the installation process has finished, click on “Close” to close the NVIDIA Graphics Driver Installer window.
Restart your computer to finish the installation process.
21. After rebooting, press Windows Key+R and write “control printers“.
22. Click on “OK“.
24. Now, right-click on your computer name and then click on “Device installation settings“.
25. Now, choose “Yes (recommended)” and click on “Save Changes“.

You should not face any further issues with the installation of the NVIDIA driver.
Fix-6 Perform Clean Boot-
1. To open the Run terminal on your desktop, press Windows key+R.
2. Then, type “msconfig” and after that, click on “OK“.

3. After that go to the “General” tab
4. In the General tab, uncheck the box beside the “Load startup items“.
5. Finally, you have to make sure the “Load system services” is checked.

6. Now, click on the “Services” tab.
7. Click once beside the option “Hide all Microsoft services” to check it.
8. To disable all these services, click on the “Disable all“.
9. Now, click on “Apply” and “OK“.

Reboot your computer, it will be booted in clean mode.
Fix-7 Rollback the existing display adapter-
1. At first, right-click on the Windows icon and then click on the “Device Manager“.
Device Manager utility will open.
2. In the Device Manager window, find “Display adapters” from the list, click on it to expand it.
3. Now, from the drop-down double click on the NVIDIA graphics driver, you are using. The properties window will open.

3. ใน หน้าต่างPropertiesไปที่แท็บ“ Driver ” คลิกที่ " ย้อนกลับไดรเวอร์ " คลิกที่“ ตกลง” การดำเนินการนี้จะย้อนกลับการอัปเดตที่เก่ากว่าของไดรเวอร์กราฟิก NVIDIA ของคุณและจะถูกแทนที่ด้วยไดรเวอร์รุ่นเก่าของคุณ

4. ตอนนี้เมื่อคำถาม“ ทำไมถึงย้อนกลับ? ” ปรากฏขึ้นให้เลือก“ แอปของฉันไม่ทำงานกับไดรเวอร์นี้ ”
5. ตอนนี้คลิกที่“ ใช่ ” เพื่อเริ่มกระบวนการย้อนกลับ

ปิดหน้าต่างDevice Manager
รีบูตเครื่องคอมพิวเตอร์ของคุณ หลังจากรีบูตคุณจะสามารถอัปเดตไดรเวอร์ได้โดยไม่มีข้อผิดพลาดใด ๆ